pCon.planner 8.0: Full Innovation Ahead!
Infinite features. pCon.planner 8.0 brings a new material model. Materials are rendered on a completely new, realistic basis. In addition, this release also brings improvements in the areas of photorealistic rendering and display. With a new PDF import integration, you can easily integrate floorplans into your designs.
In this document, you’ll get to know these highlights as well as other new features.
Display und Rendering
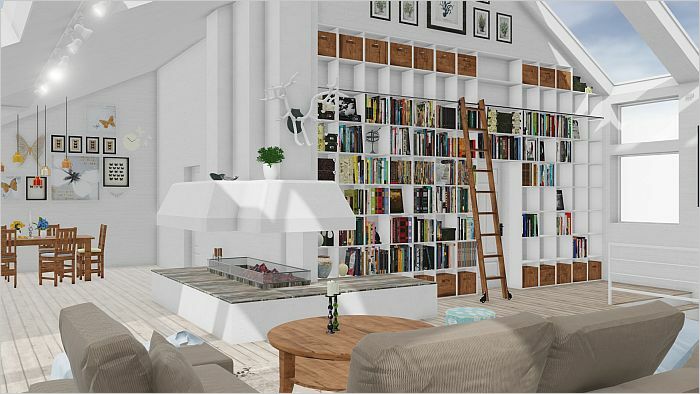
In Planning View: Beautiful Display for Quality Products (All Editions)
pCon.planner 8.0 offers extremely realistic real-time rendering. Even during the planning phase, you’ll be im-pressed with the display of materials, shadows and lighting scenarios – realism that demonstrates the quality of your products, even during planning.
Improved Plan Display
We’ve comprehensively improved real-time display for you:
| • | Realistic render mode completely reworked |
| • | Realistic, real-time shading through ambient occlusion |
| • | New lighting effect (Blooming) on self-illuminating and shiny or bright surfaces |
|
Render Mode Realistic in pCon.planner 8.0
|

|
What Render Mode Realistic looked like in pCon.planner 7.7
|
Background Image in Orthographic Mode
As a bonus, user-defined background images can now be seen in orthographic mode.
Technical Note
Please ensure that your graphic card complies with the recommended System Requirements for pCon.planner. If you use a hybrid system (i.e. a computer with an onboard and high-powered dedicated graphics card), always use the dedicated graphics card.
For the overall effect of the Realistic render style, ambient light and user-defined background are also essential. Both are saved immediately for individual DWG files. You can read more in this section.
Rearranged: Settings for Background and Real-Time Rendering (All Editions)
In pCon.planner 8.0, several of the settings involving plan background and real-time rendering have been relocated. The changes affect Render Settings and Render Styles (both found under the View tab). Completely new to the group: the Environment dialog (also found under the View tab).
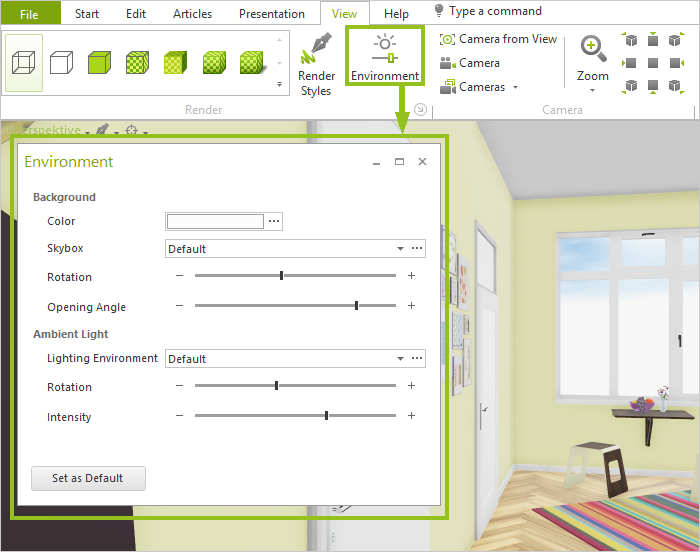
New Dialog: Environment
Your plan’s ambience can now be designed in its own dialog. You will find the button Environment under the View tab. The dialog combines the settings for the Skybox (Background or Background Image) as well as the Ambient Light. The content includes:
| • | Background Settings: Background color or use and modification of individual background panoramas (moved here from the Render Settings) |
| • | Ambient Light: Controlling the plan’s basic lighting (moved here from the Room Elements menu) |
| • | External image can be used as an alternative source of ambient light |
| • | Parameter changes are directly adopted for the DWG file and saved with the plan |
| • | Set as Default button applies the given settings as default values for the dialog |
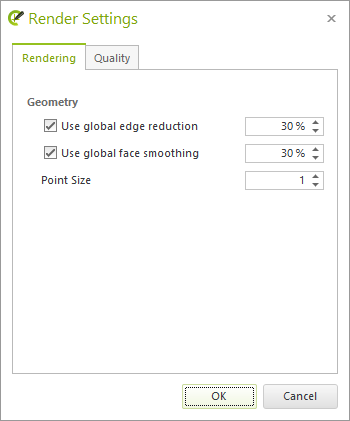
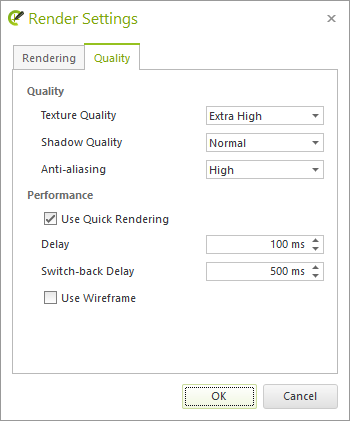
Updated Render Settings
The option Use Quick Rendering as well as its respective parameters have moved from the Rendering sub-menu to the sub-menu Quality.
The Background tab has been removed. The content for this tab can be found in the new Environment dialog.
The Render Settings can be found, as usual, by clicking on the small arrow on the View tab under the group Render.
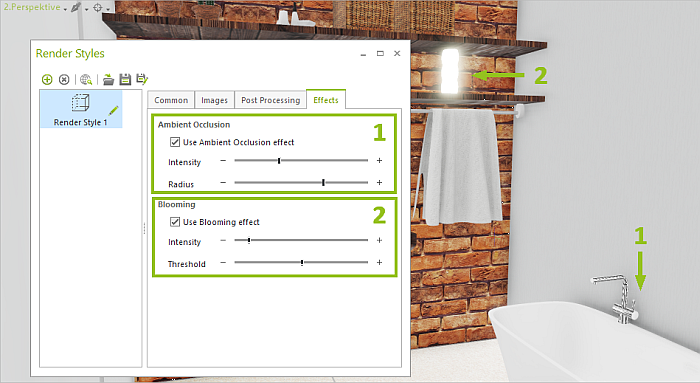
New Render Styles Tab
With pCon.planner 8.0, the Effects tab now includes the options for Blooming and Ambient Occlusion.
| • | Both effects can be used when the render mode Realistic is set as the basis for your Render Style. |
| • | Blooming: Controls the light emissions from self-illuminating and extremely bright objects. They will be given a slight glow. |
| • | Ambient Occlusion: Controls the intensity of diffuse shadows in the plan. |
The content that was previously found under the Effect tab can now be found in the new tab Post Processing.
User-friendly and Realistic Materials: Physical Rendering (All Editions)
Physical Rendering as Basis for a New Material Model
As of Fall 2018, an improved model will be used for the rendering of materials in pCon applications. The advantages include:
| • | Realistic and appealing visualization of materials in real-time mode |
| • | New materials supported by OSPRay rendering |
| • | Functions in all lighting scenarios |
| • | Behavior of materials is physically plausible and, therefore, more realistic |
| • | Improved usability in pCon.planner by limiting parameter options |
| • | Reduced setting interdependence |
| • | Materials only need to be optimized once: Many new pCon applications will use the new Material Model |
Your existing materials are automatically converted for the PBR. Generally, you will not need to adjust them.
The Material Editor has been updated, improving clarity and usability. All parameters for your new materials have been listed and clarified in our pCon.planner Help Center under the section Materials.
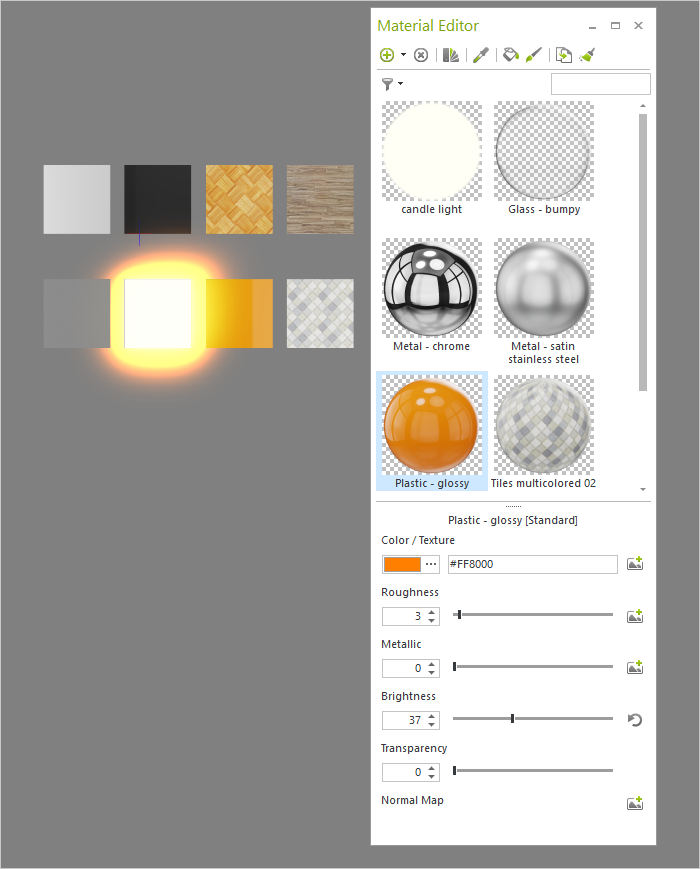
Editable OFML Materials
With the update of the Material Editor, materials on commercial articles do also become editable. We recommend only modifying OFML objects according to their configurability. Nevertheless, it could be that you want to adjust materials for a more photo-realistic image by, for example, lightening objects slightly or giving them an intense shine. Previously, you would have to convert these articles into a user article. Now, you can adjust the materials using the Material Editor.
Please keep in mind that articles using manually-changed materials cannot be ordered. In addition, the changes will be overwritten with the standard material when articles are updated.
Batch Rendering: Externally rendering a series of images (pCon.planner PRO)
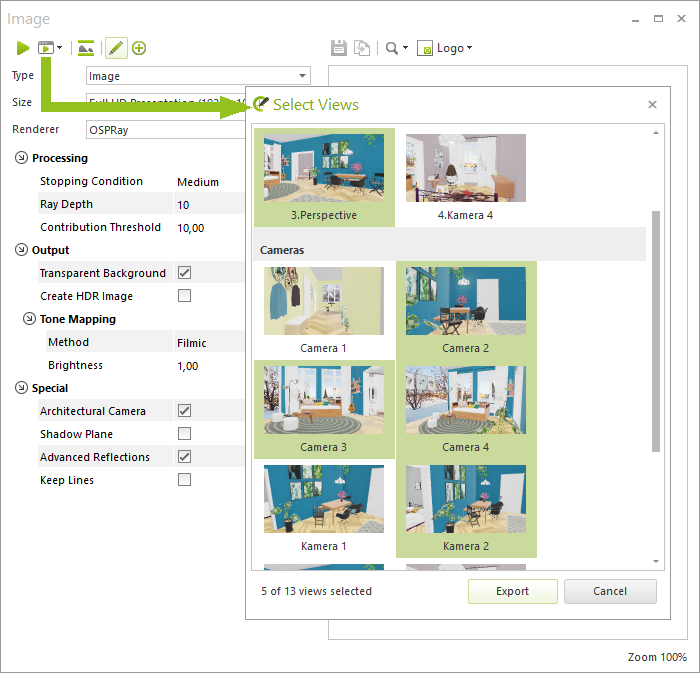
Looking to render several views of a plan simultaneously? With the new Batch Rendering feature, you can ex-port render jobs for external calculation with just one click.
To do so, click on the Export button in the Image dialog (Presentation tab). Here you can select the cameras and views that you would like to render into photorealistic images. Here’s how it works:
| • | The rendering takes places through OSPRay – for the batch rendering to work, please select OSPRay as Renderer in the Image dialog. |
| • | Your render settings will be used for the external image calculation. |
| • | Select whether you would like to render a standard image or a panorama. |
| • | The views will be transferred for the external batch rendering and calculated in the background. |
| • | You can track the progress in a browser window. |
| • | The views will be rendered one after another. |
| • | You can change the order of the jobs as well as delete or pause render jobs. |
| • | Completed images will be shown in a browser window. |
| • | You can continue to plan during the rendering process. |
| • | The settings from the Image dialog will be used for the external image calculation. |
OSPRay as Standard Renderer and with New Capabilities (All Edi-tions)
In pCon.planner 8.0, OSPRay is the standard engine for image rendering. The settings for OSPRay have been reworked and extended:
| • | Basic lighting for images with tone mapping and gamma correction |
| • | New standard tone mapping process: Filmic |
| • | OSPRay supports the new material model |
| • | OSPRay automatically accesses the ambient settings |
| • | Panoramas will be spherically displayed and saved |
| • | Enhanced usability through simplified options |
Interfaces
Import PDFs – in high quality (pCon.planner STD and pCon.planner PRO)
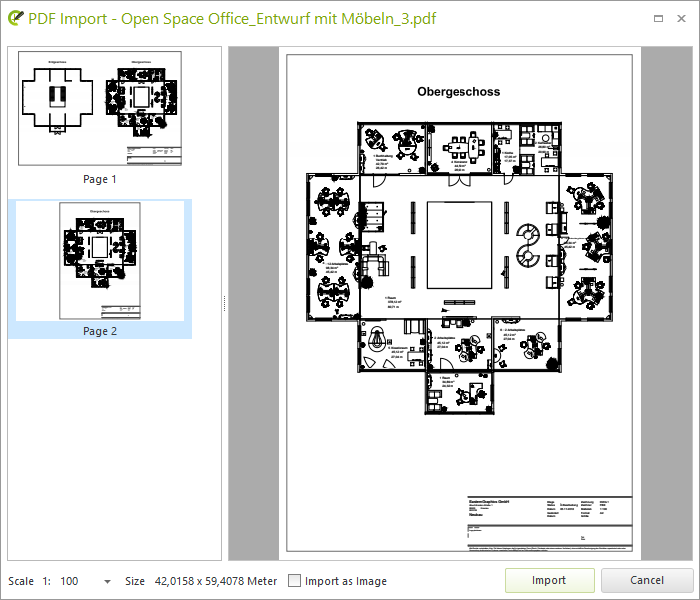
Floorplans are often available as PDFs. Our answer to this is the brand-new PDF import. Easily import floorplans as PDFs. Lines and text are kept intact, so you can create your plan directly from the PDF. Here’s how it works:
| 1. | Open the Application Menu and select Import. |
| 2. | Select the desired PDF from a local directory and click Open. |
| 3. | This will open the preview for the PDF import. Here you can: |
| o | set a scale for the import |
| o | use zoom/pan to get a better look at the content |
| o | select a specific page from a multi-page PDF |
| o | decide if you want to import the page as an image (recommended for low-quality PDFs) |
| 5. | The content of the PDF will be attached to your mouse. You can then place in within your plan. |
The imported floorplan offers several highlights:
| • | pCon.planner’s snap modes will function for the imported lines and texts. |
| • | The content will be grouped: Open the group to edit the floorplan, to change single lines, or to delete or edit text. |
| • | Using the Layers dialog, you can hide distracting parts of the floorplan (i.e. background images). |
| • | It also functions in the Layout area and can be used to import stamps. |
The quality of the imported PDF will determine the quality of the import in pCon.planner. Lines, texts and images will be imported as elements, just as they’re found in the PDF.
IFC Export (pCon.planner PRO)
In pCon.planner 8.0, you can export IFC files. This is possible for the entire plan or a selection of the plan. You will find this option in the Application Menu.
Click on Export, then select Geometry and the file type Industry Foundation Classes (*.ifc).
The export will save the contained OFML data and can be retrieved in the follow-up program.
Improved IFC Import (All Editions)
The IFC Import has been enhanced: Ceilings, floors and commercial articles will be recognized. Ceilings and floors are placed on their own layers and can be easily selected and hidden.
Additional News for Imports and Exports
| • | With pCon.planner 8.0, you can export files in gITF format. |
| • | In the OBJ export, you can now control rotation – this increases the compatibility with various VR viewers. |
| • | Exports for COLLADA (.dae format) have been improved |
| • | EOX import has been extended |
| • | When exporting in vector formats, interactors will be available in the selection area – the selection area for the export can be edited with these interactors |
Improvement in Productivity
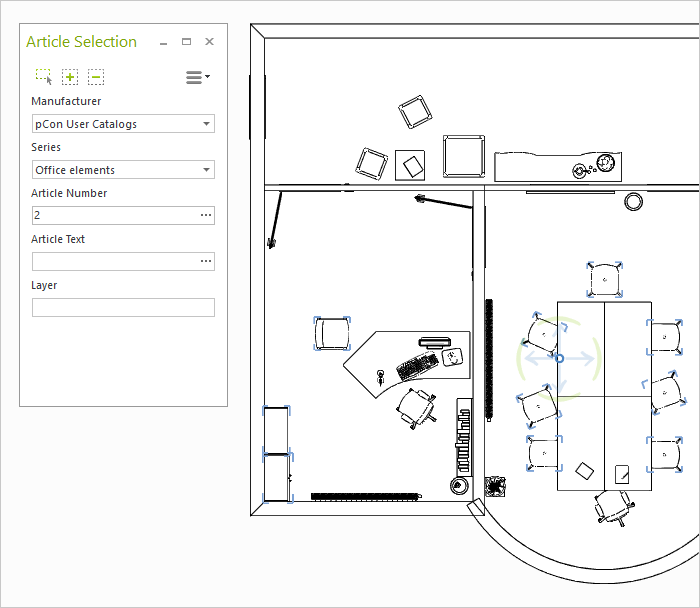
Select Articles Based on Criteria (pCon.planner PRO)
Filter from a large number of commercial articles according to content criteria – with Article Selection it’s easy. You can find this option under the Articles tab in the group Article Tools. Filter by manufacturer, series, article number, article texts and layers. You can select multiple criteria at one time. Searches based on partial information are also supported – Article number: 6, for example, will find all article numbers that include the number 6.
Based on your search criteria, you can:
| 1. | select articles in the plan |
| 2. | add articles to your selection |
| 3. | remove articles from your selection |
You can search throughout the plan for all chairs in a particular series, for example, to replace it with a different chair model. You will learn how this works in the following section.
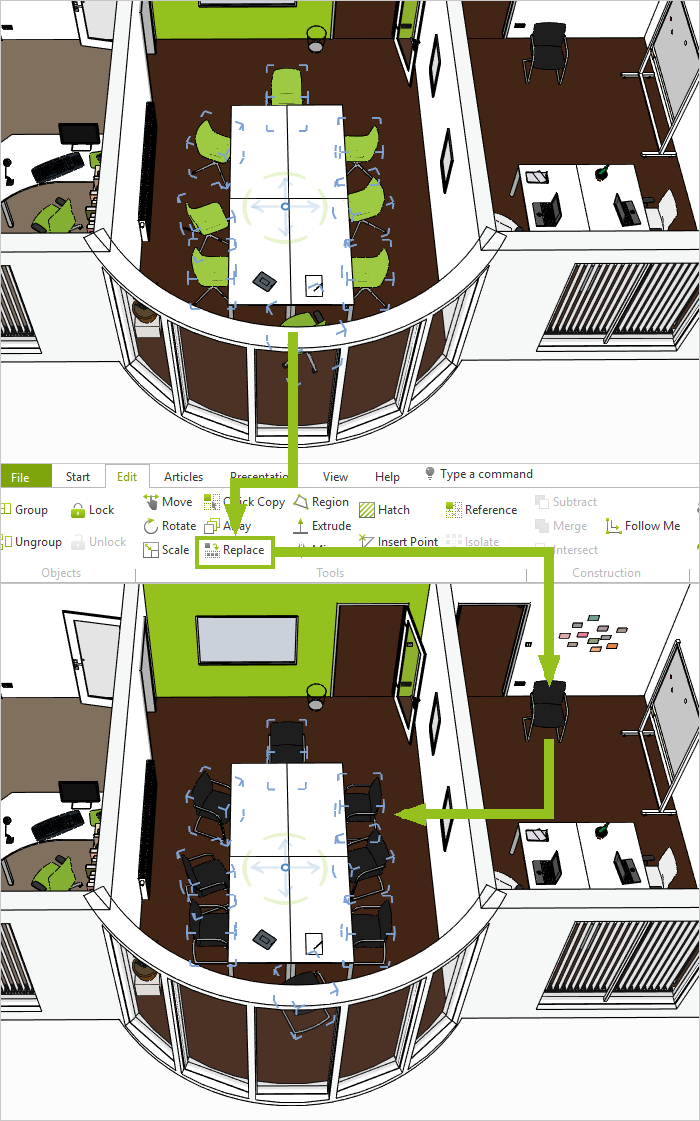
Replace Objects (All Editions)
Under the Edit tab, you will find the Replace function. With this, you can:
| • | replace selected articles in the plan with other articles |
| • | insert the new articles as reference copies (Context Menu) |
| • | replace additional objects in the plan – geometries, drawing elements or texts – with others |
The object that you want to use as a replacement for others must exist in the plan at least once.
Here’s how you can use the Replace function:
| 1. | Select all objects in the plan that you would like replaced (using the tool Article Selection, for example). |
| 2. | Switch to the Edit tab and click on Replace. |
| 3. | Click on the object in the plan that you want to use as a replacement for the originally selected articles. |
Additional New Article Features (pCon.planner PRO und pCon.planner ME)
| • | Modified insertion behaviors for articles: Articles are opened for editing in the Properties Editor directly after insertion. |
| • | Articles without 3D depiction will be shown in pCon.planner in the form of info fields with important information and, if necessary, as an article image. This improves the support of Easy OFML as well as the compatibility with pCon.box. |
Input and Dimensions (All Editions)
In the Properties Editor, there are now additional options for the input lines for drawing and planes or for changes in dimensions. Some examples include:
| • | Mathematical operators in the input: 2m+5cm |
| • | Foot/inch as measurement units and fractional dimensions: 155/8 |
| • | Format for length and angular dimensions: 2.6r |
Replace Materials (All Editions)
The function Replace Material is a new paint bucket that will help you replace a selected object’s material with another:
| 1. | Select one or more objects within the plan. |
| 2. | Open the Material Editor. |
| 3. | Select a material within the Material Editor. |
| 4. | Click on the paint bucket in the Material Editor. |
| 5. | Rightclick to open the context menu and select Replace Material. |
| 6. | Click on one of the selected objects within the plan. The material will replace the material for all selected objects. |
Place Objects When Inserting (All Editions)
New shortcuts allow for the insertion of objects at more precise points in pCon.planner. When inserting, you can simply press a particular key combination. The new object will then be arranged in relation to the selected element within the plan.
The Alt key, for example, will insert the new object to the right of your selection. You can find the other possibilities in our Shortcuts Table.
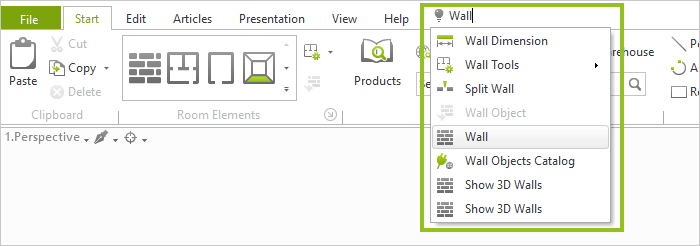
Find and Execute Commands Faster (All Editions)
On the top edge of the ribbon, you will find a new search field. Here you can find desired commands more efficiently: Type the search term, select the desired command from the results, click on it and continue working.
Additional Changes in Productivity (All Editions)
| • | Many room, wall and installation objects will be generated much faster in pCon.planner 8.0. Small details, such as door handles or pipeline surfaces, will also appear more aesthetically pleasing. |
| • | Separation of groups in multi-selection: Several selected groups can now be ungrouped simultaneously. |
| • | Simple scaling: Snapping to the scaling axis has been simplified so that it is quicker to find the desired direction for your scaling process. |
| • | Display Skybox in Layout: For perspective and orthographic viewports, you will find the new option Background in the Properties Editor. This will allow you to select transparent or filled backgrounds or the background image defined in the planning area. |
| • | pCon.planner display improved: Scaling and resolution are now automatically adjusted for high-resolution, large monitors. |
| • | The Comments function is no longer supported: Plans created in older versions of pCon.planner will be displayed without the contained comments. |
| • | Arrangement of viewports in the planning area: The variation Overview (with a large and small viewport) has been replaced with the option One + Two, with one large and two small viewports. |