New features in all versionsPrint
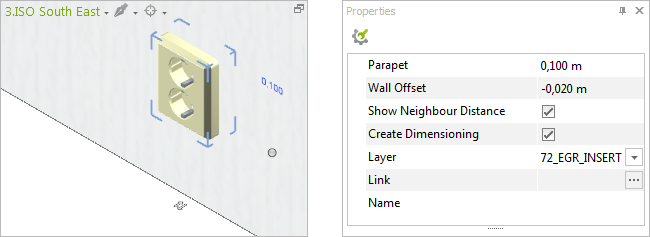
Wall Objects: New catalog with outlets and other wall attachments
Outlets, light switches, door openers: Wall Objects like these are a staple of nearly every wall and ought to be taken into consideration when designing the interior of existing rooms. When planning new buildings, making sure that there are enough outlets, etc. is just as important.
|
That importance is reflected by pCon.planner 7.1, which now lets you plan walls with a variety of predefined elements. A new Wall Objects Catalog includes prepared built-in and add-on objects. You can access the catalog from the Room Elements menu (in the Start tab). |
The new Wall Objects are a permanent part of the wall and stay put even when you move the wall by means of its interactors or edit it otherwise. Just like doors, windows and other wall elements, Wall Objects come with their own interactors for adjusting them. Other properties are available from the Properties Editor.
You can use outlets, switches etc. from the Wall Objects Catalog on walls as well as on roof pitches.
Go to pCon.planner online help to find all the information you need on inserting and editing Wall Objects:
|
|
|
|
Go to the Attach Object to Wall function in the Start tab and select any 3D object you would like to turn into a wall object. See the help section on Wall Objects to see how to proceed: |
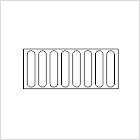
The Extrude command has long been part of the pCon.planner repertoire. Now, however, you can also extrude nested or overlapping 2D shapes as a unit: when you select them together, the shapes will be automatically linked into a single object during the extrusion process.
This expanded feature allows you to generate complex shapes—create a tube from two concentric circles, or use nested 2D shapes to make a plate with a grid.
|
|
|
|
Create complex 3D objects with just one extrusion |
|||


Material Editor: new options for materials
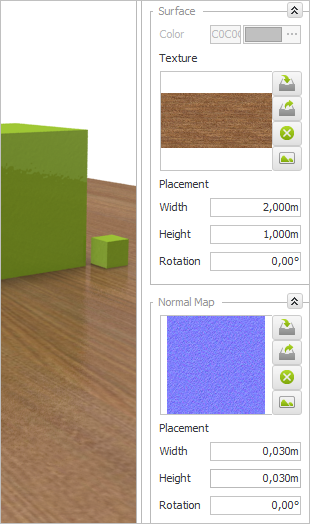
The Material Editor allows you to integrate a Normal Map that simulates shadows and surface structures. Expanded Normal Map options have been introduced in pCon.planner 7.1: previously you could only adjust Height, Width and Rotation for the Material in a general way, but now you can input these values for both the Texture and the Normal Map of the Material.
If you want to edit a Material or create a new one, you can now edit the Texture and surface relief independently of each other, giving you even more freedom to design realistic materials.
Furthermore, users will be able to select multiple materials from the Material Editor at the same time. This option makes it easier for users to perform operations such as saving materials in the Media Browser.
|
|

Results of separate scaling for a Normal Map: On the left side, a wood texture with a poorly scaled Normal Map is displayed - On |
Additional updates and enhancements in all versions
Refinement of the User Interface
|
The Connect, Disconnect and Split Wall operations are now available from their own drop-down menu, located in the Room Elements group in the Start tab. |
Loading Drawings in Recover Mode
Opening defective DWG files using the standard method can cause pCon.planner to crash. The new Recover mode can prevent this from happening.
The Recover option is located under Purge in the Application Menu. If you use this command to open an existing DWG file, the software will execute a repair routine while the file is loading.
|
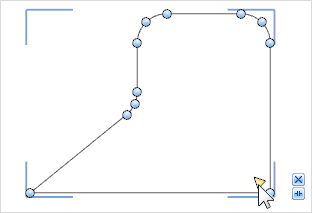
The new version of the program lets you round off the corners of polygons, polylines and rectangles in a few simple steps. Once you have defined the radius for the curve of a corner, you can use this value for all of the other corners simply by clicking the interactors. |
Rounding the edges of a polygon by clicking the interactors |
Improved Visibility for 2D Elements in pCon.planner 7
In pCon.planner 7, the visibility of images, texts, and 2D Drawing Elements was restricted in some 2D views. Thanks to the update, 2D elements are now automatically given a frame that highlights them in every view, making it easier to perform operations such as selecting.
For images, a new Hide border option is now available in the Properties Editor. If you deactivate this feature, a frame will be inserted along the edges of the image.
Render Mode as Option for Print Preview
The Render Mode can now be set in the Print Preview of every edition. You can set up this mode from the Properties Editor.